Hi everyone
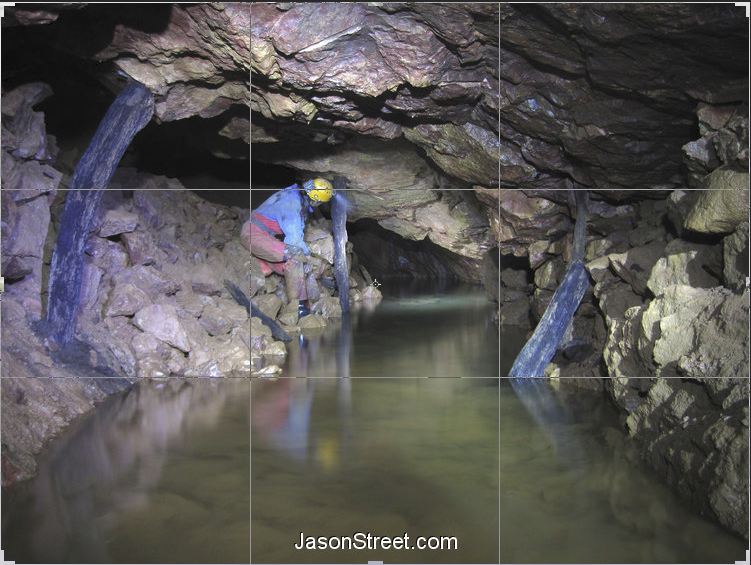
It was good to meet you all yesterday. Here is my first image and a old favourite of mine.
Taken on an old canon compact in an iron mine somewhere in the forest of dean.
basically an 8 second exposure at f2.8 with ISO 80.
Sorry about the watermark but I'm at work and cant get to the original.
feed back very welcome.
Jase
Hole in the ground
Re: Hole in the ground
Hi Jase
Your first image on this critique forum is an interesting one and quite a challenge for me to critique. Anyway these are my thoughts:
Long exposure created a nice reflective surface on the water and that works really well. One is compelled to look in the direction your subject is looking at, but what exactly it is he is looking at remains a mystery. If this was my image I would probably crop out quite a bit from the left as it competes for attention with your main subject. I'd probably crop a bit off the bottom too. That would improve the composition.
Thanks for posting.
-
- Posts: 7316
- Joined: Tue 11 Sep 2012, 16:38
- Contact:
Re: Hole in the ground
Hi Jase
It was good to meet you last night as well.
In terms of this first image you have presented to us, I am generally in agreement with Nina. It is not the type of image which we see much of in a camera club, being more documentary in style. There are plenty of examples of members' work both on this forum and the club's website which will give you a good idea of the sort of work members usually produce. It makes a refreshing change to see something different. I suspect that in this instance the picture means a lot to you, possibly because it is a favourite location or some other reason, and the challenge that we all face in photography is conveying this feeling to the viewer. This is where a camera club can help in providing the means for images to be critiqued by others, either in competition or the forum as here. There is value in learning how others view our images and sometimes it is not what we expect.
From a compositional point of view, the positioning is very central. The main points of interest are the caver and the tunnel beyond, both of which are in the middle of the frame. Whilst there are exceptions, usually central placement results in a static image and a more dynamic result can be achieved by placing the main elements away from the centre. A well known guideline is the "rule of thirds", which encourages the positioning of important elements to areas of the frame where they will have a stronger impact.
Below, I am showing your image with the rule of thirds grid overlaid in which you can see the two main elements fall with the central rectangle. The strongest positions tend to be along the grid lines or, even better, the four places where they intersect. Incidentally, although it is called a "rule" and based on scientific principles, it is really more of an indication of where to place components within the frame. When it comes to composition, there are no rules and anything can be made to work in the right circumstances if you know what you are doing.
In the second example, I have cropped along the lines that Nina suggested to place the caver more on the left hand vertical third and get the tunnel more towards the right hand vertical third and the water in the tunnel closer to the lower horizontal third. This has preserved the pleasing reflection of the caver and tightened the composition to concentrate the eye on the most important elements in the scene without losing a sense of context. I have also boosted the colours a bit and applied some sharpening (images can often be a bit soft straight out of camera).
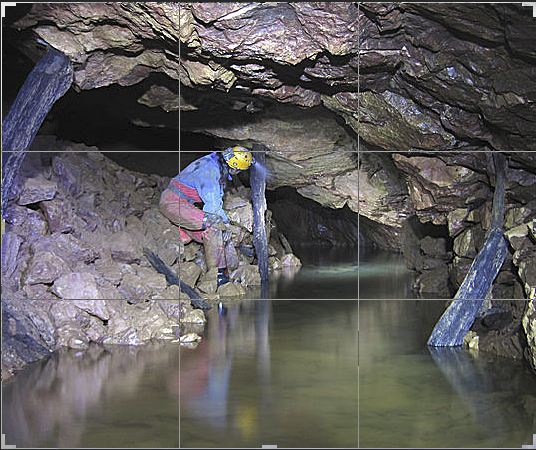
The third example is the scene without the gridlines. I have boosted things a bit more and applied a vignette to darken the edges down to help lead the eye towards the main elements. Whether or not this is too much and departs from the reality of the scene and what you wanted to show is a matter of individual taste, of course. The original looks as though it was a straight shot and I wanted to show the potential for tweaking images in post capture processing. There was a bright area on the right which I have removed, since that could have been a distraction due to the eye's tendency to be attracted by lighter tones. It's generally best to place these where you want the eye to end up, rather than on the edges.
I am not a caver and it is to your credit that you have managed to get a shot at all in what were obviously challenging conditions. Without knowing what you were faced with, it is not really possible to say definitively whether there was a better shot to be had. It does look as though there was room to the left, which would have allowed you to get more of a diagonal between the caver and the tunnel so that could be positioned more towards the sides. It's a balancing act between keeping a sense of place and highlighting the important elements, but I would have looked for ways to make the caver more prominent in the shot. I appreciate only too well that stopping for photography slows things down, but if there is time it is always worthwhile exploring different angles after the taking the initial shot to what other possibilities exist.
Thanks for sharing this image and I trust that you have found the feedback useful.
Re: Hole in the ground
If that's an 8 second exposure that chap must have held his position for an awfully long time!
Re: Hole in the ground
Thanks Nina, Dave
WOW! you have brought that image up a level. I must admit I was not thinking about rule of thirds when setting this up. I was more interested in capturing the scene then drawing attention to the caver. A mistake on my part.
It was a tricky shot to set up as my shooting location was determined by not disturbing the water. Then it was a case of lining up the camera and light painting with my head torch.
always fun with a group of 10 impatient caves behind me. with these sort of shots I try to get the reflections wile keeping the cavers light pointing away from me. If i remember correctly I have 2 chances of getting this shot. in the other, my breath blurred a section and Andy moved.
thank you very much
Jase
Who is online
Users browsing this forum: No registered users and 40 guests